Ultimate Guide to Fixing a Leaky Faucet (2025): Step-by-Step Instructions
Everything You Need to Know About Fixing Faucet Leaks: All Steps A to Z
That drip, drip, drip isn’t just annoying – it’s costing you money! Did you know that a leaky faucet can waste up to 3,000 gallons of water per year? That’s not just bad for the environment – it’s terrible for your water bill!
After spending 15 + years fixing faucets in homes in Florida, I’ve seen every type of leak imaginable. But here’s the good news: fixing a leaky faucet is totally doable for most homeowners, and I’m going to show you exactly how to do it.
Trust me, there’s nothing quite like the satisfaction of fixing your first leaky faucet – I still remember my first repair job back when I was just starting out. I was so nervous about making things worse, but with the right tools and guidance, it turned out to be much simpler than I expected.
Tools and Materials Needed for Faucet Repair
I always make sure I have the right tools before starting any repair job.
Here’s what you’ll absolutely need (and I mean need – don’t try to skip these!):
1.) An adjustable wrench (8-inch is perfect for most jobs)
2.) Phillips and flathead screwdrivers
3.) Penetrating oil (WD-40 or similar)
4.) Pliers (both needle-nose and channel-lock)
5.) Replacement parts specific to your faucet type
6.) Plumber’s tape
7.) Clean rags
(Optional) basin wrench (this is a game-changer for those hard-to-reach spots)
I’ve learned through trial and error that having replacement parts ready before you start is crucial. Nothing’s worse than taking apart your faucet only to realize you need to run to the hardware store!
Pro tip: Take photos of your faucet before disassembly. I can’t tell you how many times this simple step has saved me from reassembly confusion. And always place your parts in order as you remove them – I use an old ice cube tray to keep everything organized.
The cost comparison between DIY and professional repair is pretty striking. While a plumber might charge $150-300 for a simple faucet repair, doing it yourself typically costs $20-50 in parts. That’s some serious savings!

Identifying Your Faucet Type and Problem
Over my years of experience, I’ve worked with every type of faucet imaginable, and let me tell you – knowing your faucet type is half the battle. I remember one particularly frustrating afternoon when I was trying to fix what I thought was a compression faucet, only to discover it was actually a cartridge type.
Here’s a breakdown of the four main types you’ll encounter:
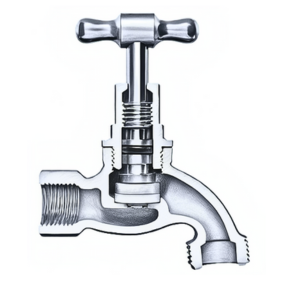
a.) Compression Faucets: These are the old-school type with separate handles for hot and cold. If you have to push down on the handle to turn off the water completely, you’re dealing with a compression faucet. They’re the simplest to fix but tend to need more frequent maintenance.
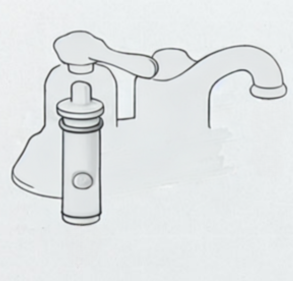
b.) Cartridge Faucets: This type moves up and down or side to side. They’re my personal favorite to work on because once you identify the correct cartridge, repairs are straightforward. The trick is getting the right replacement cartridge – there are hundreds of types out there!
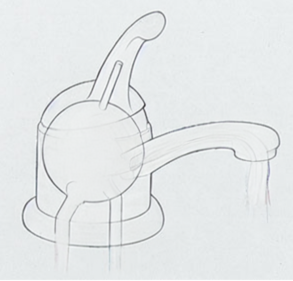
c.) Ball-Type Faucets: Common in kitchen sinks, these have a single handle that moves over a ball joint. I call these the “puzzle faucets” because they have more parts than any other type. The first time I took one apart, I spread out all the pieces on a white towel to keep track of them!
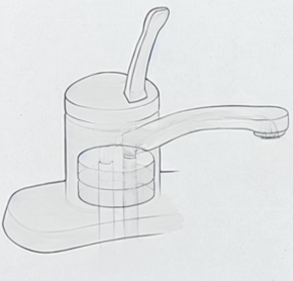
d.) Ceramic Disk Faucets: These are the newest type and typically the most reliable. You can identify them by their smooth operation and single-handle design. They rarely leak, but when they do, it’s usually due to sediment buildup.
The most common leak locations I see are:
– Around the spout (usually an O-ring issue) – At the base of the handle (typically a packing nut problem) – Under the sink (often a connection issue) – When the handle is in certain positions (could be the cartridge or seals)
Step-by-Step Repair Process for Different Faucet Types
Having fixed thousands of faucets over the years, I’ve developed a foolproof process that works for any type. Let me walk you through it, starting with the most important.
First Things First:
1. TURN OFF YOUR WATER SUPPLY! Sounds obvious, right? But you’d be amazed how many people forget this step. The shutoff valves are usually under the sink. Give them a quick test by turning on the faucet afterward to make sure the water’s completely off.
2. Plug the drain. It is extremely easy to lose tiny pieces like springs that go down the drain and end up in your P-trap. I always cover the drain with a rag or drain cover before starting.
For Compression Faucets:
3. Remove the decorative cap on the handle (usually pops off with a flathead screwdriver).
4. Unscrew the handle screw and remove the handle.
5. Use a wrench to remove the packing nut.
6. Unscrew the stem.
7. Replace the washer and O-ring (99% of the time, this fixes the leak).
For Ceramic Disk Faucets:
3. Remove the handle.
4. Unscrew the retaining collar.
5. Pull out the ceramic disk cartridge.
6. Replace the cartridge with an identical model.
7. Reassemble the faucet.
For Cartridge Faucets:
3. Remove the handle (look for a set screw, usually hidden).
4. Remove the retaining clip (don’t lose this little guy!).
5. Pull the cartridge straight up (might need pliers).
6. Replace with an identical cartridge.
For Ball-Type Faucets:
3. Remove the cap and handle.
4. Unscrew the ball cap and remove the ball.
5. Replace the seals, springs, and washers.
6. Reassemble the faucet in reverse order.
Troubleshooting Common Issues
Here are the most common problems I encounter and their solutions:
Let me share something I learned the hard way – sometimes what seems like a simple leak can turn into a real head-scratcher. I have seen work on a kitchen faucet that kept dripping no matter what was replaced. Turns out, the problem wasn’t the faucet at all – it was high water pressure causing the issue!

Persistent Leaks After Repair:
- Double-check all O-rings are properly seated.
- Ensure the replacement parts match exactly.
- Look for hairline cracks in the faucet body.
- Test your water pressure (should be between 40-80 PSI).

Sudden Increase in Water Flow:
- Examine the aerator for clogs or debris.
- Verify the shutoff valves are fully open.
- Test the water pressure to ensure it’s within the proper range.

Leaks from the Base of the Faucet:
- Check the mounting gasket or washers for damage.
- Ensure the faucet is properly aligned and tightened to the sink.
- Look for cracks in the sink surface around the faucet base.
Drips from the Spout When Closed:
- Inspect the valve seat and springs for wear.
- Replace the cartridge or stem assembly if necessary.
- Check for mineral buildup on valve components.
Stuck or Corroded Parts
- Use penetrating oil liberally.
- Apply gentle heat with a hairdryer or heatgun.
- Try a specialized faucet part removal tool.
**Never force parts
– you might crack the faucet body.

Preventive Maintenance Tips
An ounce of prevention is worth a pound of cure – especially when it comes to faucets.
Below is a bonafide maintenance routine that can prevent most common problems.
Monthly Maintenance:
Clean aerators (those little screens at the tip of the spout).
Check for moisture under sinks.
Test shutoff valves.
Listen for unusual sounds.
Monitor water pressure.
Seasonal Maintenance:
Deep clean all faucets with vinegar solution.
Check for outdoor faucet damage.
Inspect supply lines.
Test water pressure.
Lubricate moving parts.
Advanced Tips and Professional Secrets
After fifteen years in the business, you pick up a few tricks that can make faucet repair faster and easier. Here are some of my favorite pro tips that you won’t find in the instruction manual:
1.) The Silicone Trick: Before installing any new O-rings, I always apply a tiny amount of food-grade silicone grease. This helps them seat properly and prevents premature wear. Just don’t use regular grease or plumber’s grease – it can degrade the rubber.
2.) The Vinegar Soak: For stubborn mineral deposits, I remove the aerator and soak it overnight in white vinegar. Works better than any commercial cleaner I’ve tried!
3.) The Baking Soda Trick: For tough mineral deposits on aerators or cartridges, make a paste with baking soda and water, then let it sit for 30 minutes before scrubbing. The abrasiveness helps break down the buildup.
4.) The Magnet Test: If you’re having trouble removing a stuck cartridge, try using a strong magnet. Carefully slide it along the faucet body to see if the cartridge is magnetic. If so, the magnet can sometimes grab and pull it out.
5.) The Plumber’s Putty Seal: When reinstalling faucets, apply a thin bead of plumber’s putty under the base to create a watertight seal. This helps prevent leaks from the mounting surface.
Last Thoughts...
Remember, fixing a leaky faucet isn’t just about stopping an annoying drip – it’s about saving water, money, and preventing potential water damage to your home. With the right tools and a bit of patience, you can tackle this repair yourself and save hundreds on plumber fees. And if you found this guide helpful, don’t forget to bookmark it for future reference.
Remember, every successful repair starts with preparation and ends with satisfaction. Now get out there and fix that leak! Your wallet will thank you.
Disclaimer: The information provided on this blog is for general informational purposes only and does not constitute professional advice. We are not liable for any damages or injuries resulting from attempts to repair plumbing systems based on the content herein. Always consult a licensed professional before undertaking any plumbing repairs.